Mastering Excel: Effortlessly Adjust Column Widths
Wrestling with unwieldy Excel spreadsheets? Data overflowing its confines? Frustration mounting? Taming your data and achieving spreadsheet zen is often as simple as adjusting your column widths. This seemingly minor formatting tweak can dramatically enhance readability, printability, and overall data presentation. This comprehensive guide dives deep into the art of Excel column width manipulation, empowering you to conquer spreadsheet chaos and present your data with clarity and precision.
Imagine presenting a meticulously crafted report where crucial data is truncated or, conversely, where excessive whitespace makes it difficult to discern patterns. Proper column width management is the key to avoiding these pitfalls. Whether you're dealing with financial reports, sales data, or project timelines, controlling column width is fundamental to effective data communication.
Since the early days of spreadsheet software, adjusting column widths has been a core feature. It addresses the basic need to display data effectively, regardless of its length. While the specific methods have evolved with different software iterations, the underlying principle remains constant: ensuring data visibility and optimal presentation.
The primary issue surrounding column width adjustment is finding the balance between displaying all necessary information and maintaining a compact, readable layout. Too narrow, and data is hidden; too wide, and the spreadsheet becomes sprawling and difficult to navigate. This guide will equip you with the knowledge and techniques to strike that perfect balance.
Modifying Excel column widths is not merely about aesthetics; it's about data integrity and accessibility. Truncated data can lead to misinterpretations, while excessive whitespace can obscure trends and patterns. Mastering this skill is paramount for anyone working with data in Excel.
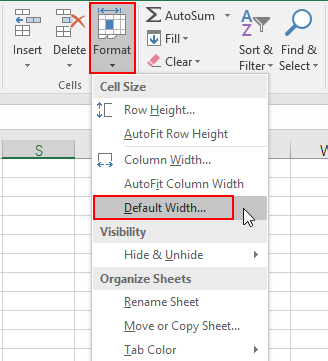
You can adjust column widths in several ways. Selecting the column header and dragging the border allows for manual resizing. Double-clicking the border automatically adjusts the width to fit the widest cell content. The "Format" menu within the "Home" tab provides precise control over column width, allowing you to input specific numerical values.
Benefits of Proper Column Width Management:
1. Enhanced Readability: Clearly visible data facilitates quick comprehension and analysis, saving time and reducing errors.
2. Improved Printability: Correctly sized columns ensure that all data fits within the printed page, eliminating the need for awkward page breaks or truncated information.
3. Professional Presentation: A well-formatted spreadsheet conveys professionalism and attention to detail, enhancing the credibility of your data.
Step-by-Step Guide to Adjusting All Column Widths:
1. Select all columns by clicking the blank rectangle at the intersection of the row and column headers.
2. Double-click the right border of any selected column header. This automatically adjusts all column widths to fit their respective content.
Alternatively, you can drag the right border of any selected column header to manually resize all columns simultaneously.
Best Practices:
1. Consistency: Maintain consistent column widths within related data sets for improved visual organization.
2. Contextual Sizing: Adjust widths based on data type and length for optimal readability. Number columns may require less width than text columns.
3. Auto-Fit with Caution: While convenient, auto-fit can sometimes result in excessively wide columns. Manually fine-tune as needed.
4. Wrap Text Strategically: Use text wrapping for lengthy cell content to avoid overly wide columns.
5. Preview Before Printing: Always preview your spreadsheet before printing to ensure correct formatting and avoid truncated data.
Frequently Asked Questions:
1. How do I resize multiple columns at once? Select the desired columns and drag the border of any selected column.
2. Can I set a default column width for new worksheets? Yes, you can adjust the default column width in Excel's options.
3. How do I prevent data truncation? Adjust column widths to accommodate the longest data entry or use text wrapping.
4. What is the best column width for numbers? It depends on the specific numbers, but generally, a width that comfortably displays the largest value is sufficient.
5. Can I change column width in a protected worksheet? Not directly, unless the protection settings allow for column width adjustments.
6. How do I reset column widths to their default? Select the columns, go to Format -> Column Width, and enter the default value.
7. How do I hide a column? Right-click the column header and select "Hide."
8. Can I adjust column width using keyboard shortcuts? Yes, there are several shortcuts for adjusting column width in Excel.
Tips and Tricks:
Use the "Zoom" feature to get a better overall view of your spreadsheet and assess column width effectiveness. Consider using conditional formatting to highlight specific data points and further enhance readability.
Advantages and Disadvantages of Adjusting Column Widths
| Advantages | Disadvantages |
|---|---|
| Improved readability | Can be time-consuming for large datasets |
| Better printouts | May require manual adjustments after auto-fit |
| Enhanced data presentation | Can disrupt pre-existing formatting |
Mastering the art of adjusting Excel column widths is a crucial skill for anyone working with spreadsheets. It empowers you to present data effectively, enhance readability, and ensure accurate information delivery. By implementing the tips, tricks, and best practices outlined in this guide, you can transform your spreadsheets from chaotic data dumps into visually appealing and highly informative documents. Take control of your data presentation today and unlock the full potential of your Excel spreadsheets. Don't let poorly formatted data hinder your message; embrace the power of precise column width control and watch your spreadsheets flourish.
The darth vader virgin birth a deep dive into sci fi mythology
Understanding llcs a comprehensive guide with examples
Level up your love game the ultimate guide to cute memes for your bf


