Boat Trailer Wiring Revelations A DIY Deep Dive
Is your boat trailer wiring looking more tangled than a fishing line after a shark attack? Don't let frayed wires and flickering lights sink your next boating adventure. This isn't about slapping on a band-aid; we're diving deep into the art of boat trailer rewiring. Get ready to transform your trailer from electrical enigma to a beacon of boating brilliance.
Rewiring a small boat trailer may seem daunting, like choosing the perfect shade of nautical navy, but it's a surprisingly manageable DIY project. This comprehensive guide will equip you with the knowledge and confidence to tackle this task head-on, leaving you with a trailer that's not only seaworthy but also electrically sound. Forget paying exorbitant fees for a professional; you've got this.
Historically, boat trailer wiring hasn't exactly been the pinnacle of technological advancement. Early trailers relied on basic systems prone to corrosion and failure due to constant exposure to the elements. Over time, advancements like sealed connectors and marine-grade wiring have improved reliability, but understanding the fundamentals of how these systems work remains crucial for any boat owner. A properly wired trailer is not just about convenience; it’s a safety imperative, ensuring your boat’s lights function correctly and you remain visible to other drivers, especially at night or in inclement weather.
The most common issues with boat trailer wiring stem from corrosion due to water exposure. Frayed wires, broken connectors, and blown fuses are the usual suspects. These problems can lead to malfunctioning lights, which can be a safety hazard and result in hefty fines. Understanding how to diagnose and address these issues is essential for maintaining a safe and functional trailer.
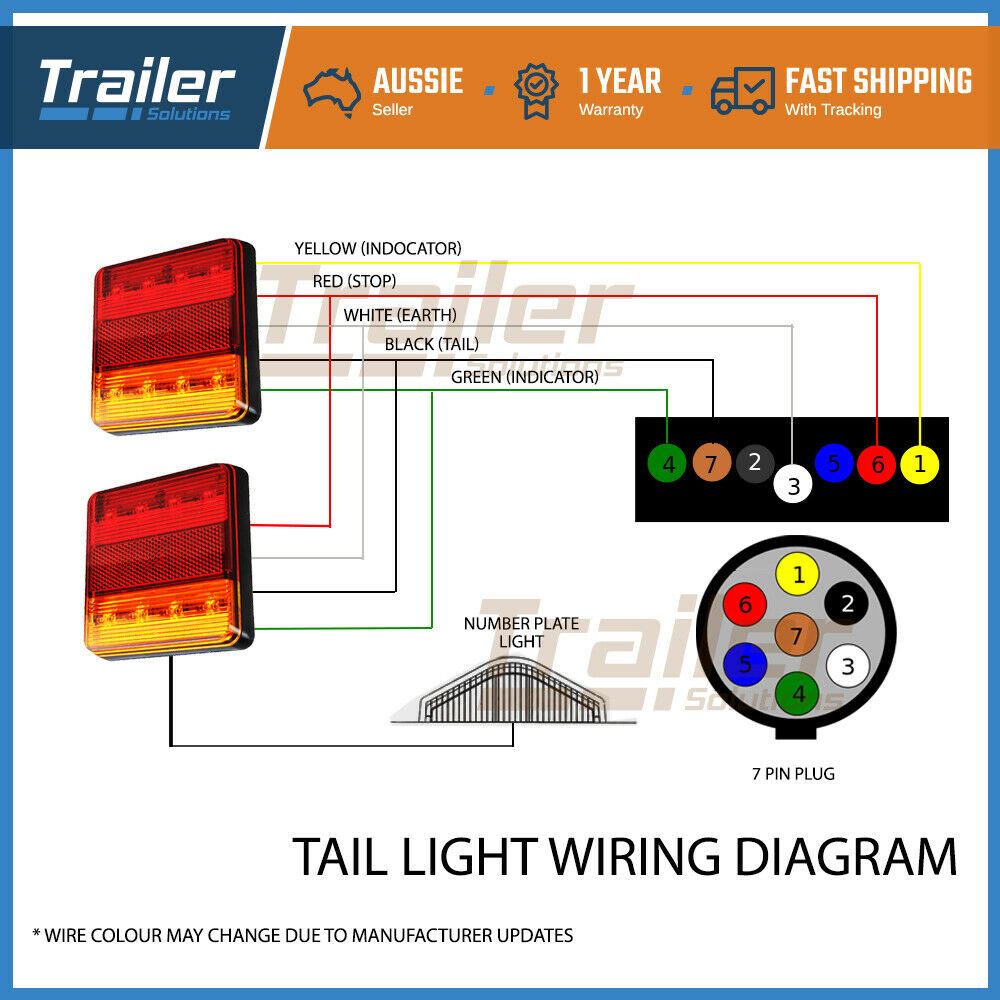
Before diving into the rewiring process, let's clarify some terminology. "Marine-grade wiring" refers to wire specifically designed to withstand the harsh marine environment. It’s typically tinned copper, which resists corrosion. "Grounding" is the process of connecting a wire to the trailer's frame to complete the electrical circuit. This protects against electrical shocks and ensures the lights function correctly. A simple example is connecting the white ground wire from your tail lights to the trailer frame.
Rewiring your boat trailer yourself offers several advantages. Firstly, it saves you money – professional rewiring can be costly. Secondly, it gives you complete control over the quality of materials and workmanship. Lastly, it empowers you with the knowledge and skills to troubleshoot and maintain your trailer in the future, making you the captain of your own DIY destiny.
Creating an action plan is essential. Start by gathering the necessary materials: marine-grade wiring, waterproof connectors, heat shrink tubing, a wire stripper/crimper, and a test light. Next, disconnect the old wiring, carefully noting the connections. Then, route the new wiring, following the path of the old wiring, securing it with zip ties. Finally, connect the wires to the lights and test the system thoroughly. A successful rewiring job results in fully functional lights and a peace of mind knowing your trailer is safe and ready for the road.
Checklist for Rewiring Your Small Boat Trailer
Marine-grade wiring, Waterproof connectors, Heat shrink tubing, Wire stripper/crimper, Test light, Zip ties, Electrical tape
Step-by-Step Guide
1. Disconnect the old wiring. 2. Route the new wiring. 3. Connect the wires. 4. Test the system.
Advantages and Disadvantages of Rewiring a Boat Trailer
| Advantages | Disadvantages |
|---|---|
| Cost Savings | Time Commitment |
| Quality Control | Potential for Errors |
| Increased Knowledge | Requires Tools and Materials |
Best Practices
1. Use marine-grade wiring. 2. Use waterproof connectors. 3. Secure wiring with zip ties. 4. Test the system thoroughly. 5. Consult a wiring diagram.
Real Examples
1. Replacing corroded connectors. 2. Repairing frayed wires. 3. Installing new lights. 4. Extending wiring for a longer trailer. 5. Upgrading to LED lights.
Challenges and Solutions
1. Corrosion: Use marine-grade materials. 2. Frayed wires: Replace damaged sections. 3. Blown fuses: Check for shorts. 4. Dim lights: Check ground connections. 5. Non-functional lights: Test with a multimeter.
FAQ
1. What type of wire should I use? Marine-grade. 2. What are the common issues? Corrosion, frayed wires. 3. Do I need special tools? Yes, wire stripper/crimper. 4. How do I test the lights? Use a test light. 5. How often should I rewire? As needed, or every few years. 6. Can I use regular automotive wiring? No, use marine-grade. 7. Where can I find a wiring diagram? Online or in your trailer's manual. 8. How do I prevent corrosion? Use waterproof connectors and dielectric grease.
Tips and Tricks
Use dielectric grease on connections to prevent corrosion. Label wires for easier troubleshooting. Secure wiring with zip ties every few inches.
Rewiring your small boat trailer may seem like a daunting task initially, but armed with the right information and a can-do attitude, it's entirely achievable. This process not only ensures the safety and functionality of your trailer but also empowers you with a deeper understanding of its electrical system. By following the steps outlined in this guide, you'll avoid costly repairs, enhance your trailer's reliability, and enjoy the satisfaction of a job well done. Taking proactive measures to maintain your trailer’s electrical system ensures you’re always ready for your next aquatic adventure. Don’t let faulty wiring dim your boating experience; take control, rewire your trailer, and set sail with confidence. Remember, a well-maintained trailer is not just about getting your boat to the water; it's about ensuring a safe and enjoyable journey every time.
Bad bunny hello kitty plush the unexpected collaboration we didnt know we needed
Navigating the richland county sc family court labyrinth
Toyota rav4 rear door latch a deep dive


